Recover Data from Iomega Portable Hard Drive
Iomega portable hard drives are popular external hard drives which are generally used to store and transport files from one computer to another. Be that home user or office user the concept of external hard drive is auspicious, allowing you to take your office work anywhere. But unlike other hard drives, external hard drives too have problems which can directly impact on data loss, be it physical component failure or issues with program which guides them.
Situations Where You Would Lose Data from Hard Drive
- External hard drive may at times result inaccessible and the probable reason behind inaccessibility may be the file system damage. And there are many reasons which can lead to file system damage, some of which are virus infection, inappropriate file system conversion, mishandling of device etc.
- There are number of utilities which can be used to manage data, encrypt data on the drive. Thus any logical failure with these programs can at times result in huge data loss
- Accidental deletion, format of the drive can also be one of the several reasons which can result in loss of data
- Unknown errors while accessing the drive can sometimes turn out to be huge data loss
- Partitioning the drives can help you arrange the things in much simpler manner but if the process of partitioning is not carried out correctly then you will lose huge amount of data
- When there is any file transfer in progress make sure you do not eject the drive without the use of safe removal options
Apart from above mentioned scenarios you can come across various situations which can result in data loss from Iomega portable hard drive. However you can tackle these situations with the help of Iomega Data Recovery Software. The tool helps you recover lost data from Iomega external hard drive with much ease.
More about Iomega Data Recovery:
The software is safe and free from all kind of malicious activities thus it is safe to install and perform recovery on your computer. It is specially designed to recover data from Iomega portable hard drives. It supports recovery of data from file system such as NTFS, NTFS5, FAT16, FAT32, HFS+, HFSX and ExFAT, additionally supports recovery of data from different hard drives such as SATA, SCSI, IDE, SSD etc.
Tool allows you to recover files from not only from Iomega hard drives but also from other popular brands of hard drive such as Samsung, Seagate, Transcend, Sony, WD, LaCie etc. It allows you to customize the scanning process by selecting the files, this way your scanning will only stick to selected files resulting in quick recovery.
With the help of simple user-interface you can easily reach the recovery results without any difficulties. You can install the tool on Windows 10, 8, Vista, 7, XP, etc. it also supports recovery of data from Mac operating systems such as Lion, Mountain Lion, Mavericks, Leopard, Yosemite, El Capitan, Sierra, High Sierra, and so on.
Steps to Recover Data from Portable Iomega Hard Drive
Step 1: Download, and install free version of Iomega Data Recovery Tool on your computer. Connect Iomega hard drive to the system, in which the software has been installed. Launch the tool and select your Iomega external hard drive, and hit Scan button to initiate the scanning process.
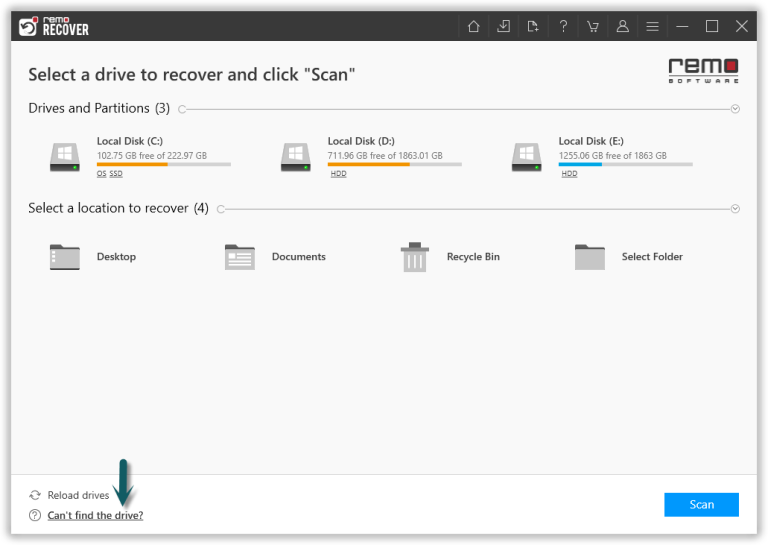
Figure 1: Main Screen
Step 2: The software now scans the Iomega drive, just wait for the tool to complete the scanning process. Upon the completion of quick scan, you can view the recovered files (during which deep scan will be in progress).

Figure 2: Software scanning the drive to find deleted & lost files
Step 3: Before saving the recovered files, just double-click on the file to preview the recovered file to evaluate the recovery results of the software.

Figure 3: Preview Recovered Files
Step 4: Finally, select the files you want to recover, and save them at the desired location of your choice.

Figure 4: Save Recovered Data
Note: Check more details on recovery of data from failed external hard drive here: https://www.iomega-datarecovery.com/external-hard-drive-failure.html