DIY Guide to Recover Files from Failed Windows 10 Hard Drive
“It was on the last week that I upgraded my OS to Windows 10. Before this upgrading, my system used to restart several times in a day. It is one of the reasons why I upgraded to Windows 10. But, this situation continued even after the up-gradation. Last day, I couldn’t able to see even the booting of the OS on my PC. I discussed this issue with my friends who are working in computer industry. Most of those people had either of these opinions, i.e., I am using a faulty BIOS or my hard drive got failed. I had replaced my BIOS chip two months back. So, chances for BIOS corruption is less, and I am sure, my hard drive has become failed. It was almost more than 100 GB of data stored in different drives on that hard drive. I am only concerned about those files. I know that there are powerful tools which are capable of performing Windows 10 failed hard drive recovery. If anyone of you can suggest any reliable tools from that category, then I will be very thankful to you. I am using a WD SATA hard drive of 250 GB.”
Since you are certain about it is an issue with hard drive failure, then don’t worry about the data which reside in it. You can use one of the most reliable tools like Iomega Data Recovery tool to recover data from Windows 10 failed hard drive. By hearing the name of this tool, some of you may think that Iomega external hard drive failure data recovery as the only target of this tool. In fact, you can use this tool for the recovery of data from both internal and external hard drives popular brands without any issue. But before knowing how to use these kinds of tools, you have to know some reasons for hard drive failure. If you go through the following list, you can understand some possible causes behind a hard drive failure which can happen in a Windows environment.
- Physical or Mechanical Failure: A hard drive consist of mechanical parts rather than electronic circuits. These parts can fail at any time due to various reasons such as aging of drive. Exposure of a hard drive to extreme temperatures, water, etc. can also result in the failure of a hard drive. You have to approach a professional service in order to attempt recovery of data from that drive.
- MBR failure: MBR or Master Boot Record is a way of storing partitioning information on your hard drive. It should be located on the first sector on a hard drive. Due to various reasons such as improper shutdown the MBR of your Windows 10 hard drive can get failed. You have to safely recover files from that Windows 10 hard drive before attempting to repair that drive.
- Third Party Utilities: Several third party tools, if not using properly, can cause logical hard drive failures. Disk repair utilities, disk partition utilities, etc. are few examples of them. Since, there won’t be any kinds of issues related to mechanical parts of a hard drive, you can go for recovering files from your Windows 10 hard dive in such situations.
Iomega Data Recovery Tool to Recover Data from Failed Windows 10 Hard Drive
This recovery software will be extremely useful for you if your Windows 10 hard drive has failed due to any kinds of logical failures. This tool works smoothly on different types of internal hard drives like SATA, IDE, etc. All the popular Windows and Mac file systems are supported by this tool along with Windows 10’s default one, NTFS. You can preview recovered files using the demo version of this tool. If it met up with your recovery needs you can purchase the full version of this tool to save those recovered files.
Note: Iomega StorCenter is a popular network storage model used on these days. These drives can be used for personal cloud storage as well as for small businesses. Even data got lost from these drives, there is no problem, since tools such as Iomega Data Recovery tool is available for such a purpose.
Steps to Recover Data from Failed Iomega Hard Drive on Windows 10:
Step 1: Download, and install free version of Iomega Data Recovery Tool on your computer. Connect Iomega hard drive to the system, in which the software has been installed. Launch the tool and select your Iomega external hard drive, and hit Scan button to initiate the scanning process.
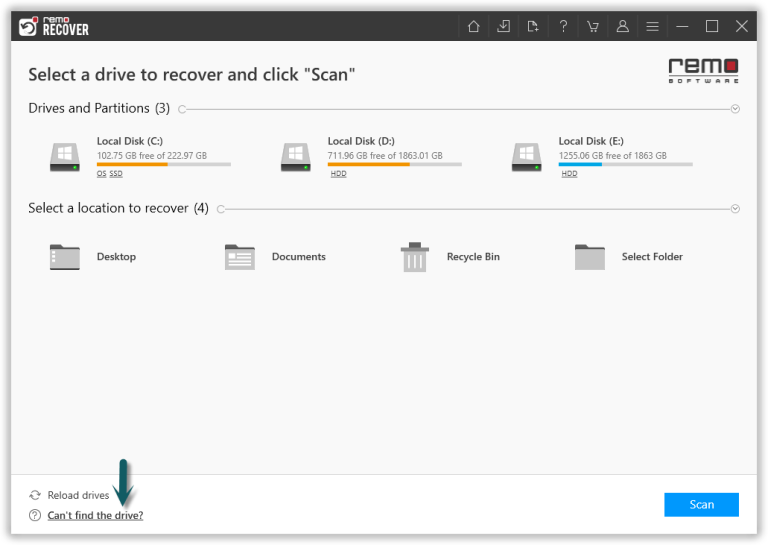
Figure 1: Main Screen
Step 2: The software now scans the Iomega drive, just wait for the tool to complete the scanning process. Upon the completion of quick scan, you can view the recovered files (during which deep scan will be in progress).

Figure 2: Software scanning the drive to find deleted & lost files
Step 3: Before saving the recovered files, just double-click on the file to preview the recovered file to evaluate the recovery results of the software.

Figure 3: Preview Recovered Files
Step 4: Finally, select the files you want to recover, and save them at the desired location of your choice.

Figure 4: Save Recovered Data