How to Recover Data from Iomega StorCenter? - An Useful Guide
Network Attacked Storage (NAS) is a data storage sever connected to a network which provides data access to its users. This server is targeted for providing access to files using network file sharing protocols such as NTS, AFP, etc. Leading storage drive manufacturer Iomega has released a network storage drives under the name “StorCenter”. These drives are available in sizes 2TB and 4 TB. It has various features such as built in media server, support for network cameras etc.
In some situations, these network storage drives can get crashed or data may get lost from it. The data on such drives may be using by several clients. So any kind of data loss from StorCenter will not be a pleasing experience of people who are using this. Anyhow, Iomega StorCenter data recovery is not a laborious task in these days of highly sophisticated data recovery tools. But to have a better understanding of recovering Iomega StorCenter data, you need to know some basic reasons behind data loss from StorCenter drives.
Below mentioned are few common scenarios leading to data loss from Iomega StorCenter:
File System Corruption: Your Iomega StorCenter drive can get corrupted due to logical errors on the drive. All the data stored in that drive become inaccessible because of this reason. You have to use a data recovery tool to restore Iomega StorCenter data here.
Faulty Firmware: If the firmware on your StorCenter drive is outdated, it can become faulty. You will not be able to access data from such a drive as a result of this.
Volume Crash: Your Iomega StorCenter drive can get crashed due to power failures, software conflicts and many other reasons. You have to safely perform Iomega StorCenter data recovery before attempting drive repairs.
Other Reasons: Apart from this, there are various other reasons for the loss of files from Iomega StorCenter like accidental drive formatting, non-mounting volumes, disappearance of drive in the network, etc.
The process of restoring data from Iomega StorCenter will not be that much difficult if you are using tools like Iomega Data Recovery tool. This tool works on the latest versions of Windows and Mac operating systems. You can get back formatted, repartitioned drives in a hassle-free way with the help of this tool.
Note: Iomega Prestige is a popular external hard drive model. In case data got lost from an Iomega Prestige hard drive, you can use this recovery tool for performing Iomega Prestige data recovery without any hurdles.
More about Iomega Data Recovery Tool
- You can make use of this recovery tool on drives formatted with various types of file systems such as FAT32, NTFS, ExFAT, FAT16, HFS, HFS+ and so on.
- It can used for recovering lost data from RAID0, RAID1 and RAID5 partitions of an Iomega drive in an effective manner.
- This tool supports various types of hard drive data transfer interfaces like SATA, SCSI, PATA, IDE, USB, etc.
- You can preview recovered data with the help of this tool before saving that data to a safe location.
- This Iomega StorCenter data recovery tool can also use for the data recovery of various types of flash memory cards, hard drives, USB drives, and many more.
- If your Iomega external hard drive get fails or crash, you can make use of this tool to get back all its files without missing a single file. You can continue reading, in case you feel it is relevant to you.
- All the popular file formats can be easily recovered using this tool.
Simple Instructions to Follow for Iomega StorCenter Data Recovery
Step 1: Download, and install free version of Iomega Data Recovery Tool on your computer. Connect Iomega hard drive to the system, in which the software has been installed. Launch the tool and select your Iomega external hard drive, and hit Scan button to initiate the scanning process.
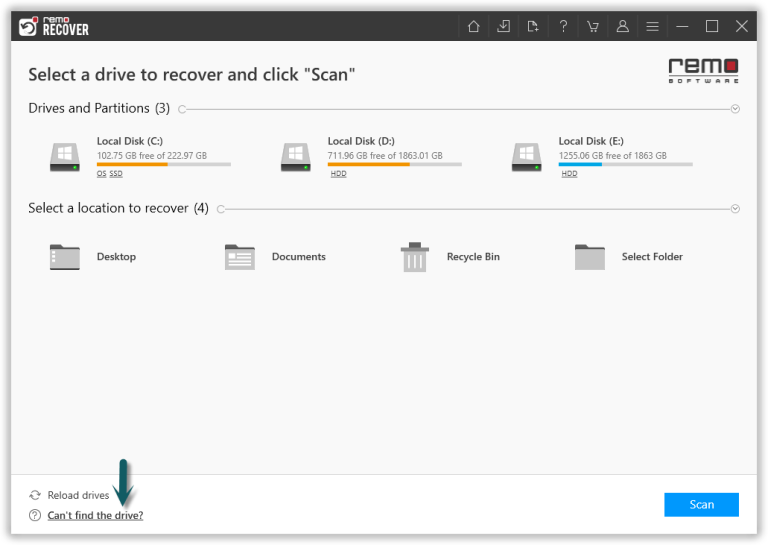
Figure 1: Main Screen
Step 2: The software now scans the Iomega drive, just wait for the tool to complete the scanning process. Upon the completion of quick scan, you can view the recovered files (during which deep scan will be in progress).

Figure 2: Software scanning the drive to find deleted & lost files
Step 3: Before saving the recovered files, just double-click on the file to preview the recovered file to evaluate the recovery results of the software.

Figure 3: Preview Recovered Files
Step 4: Finally, select the files you want to recover, and save them at the desired location of your choice.

Figure 4: Save Recovered Data
Note: Did you lose any of your important data from Iomega portable hard drive due to known or unknown reasons? If your answer is yes, then use Iomega data recovery software to recover lost data from Iomega portable hard drive in easy way. For more information, visit here: https://www.iomega-datarecovery.com/portable-hard-drive.html