This Is How Iomega eGo Data Recovery Goes Easy!
Iomega eGo is a portable or external storage device which has become most popular because of its high data transfer rate that is up to 5Gbps. Apart from this, it also has many advanced features like it has huge storage capacity due to which you will be able store any type of data on it such as image files, documents, video clips, pictures, PPTs and more. It is most reliable storage device, but still there are chances that you may lose data from your Iomega eGo hard drive.
For example, if your Iomega eGo drive gets corrupted due to some logical reasons, then you may face various error messages one among them is “Drive is not formatted. Do you want to format it now?” Due to this kind of error, you will not be able to access or extract data from your Iomega eGo hard drive. However, there is no need to get worried about this format error or Iomega eGo file recovery! Because, the data still resides in some part of your storage device so, it is possible to restore data from Iomega eGo hard drive.
But to know how to recover data from Iomega eGo hard drive, you need to make use of an excellent recovery tool known as Iomega Data Recovery Software. This advanced software has been built with advanced applications that help you to retrieve data from Iomega eGo hard drive. It also supports data recovery from RAID partitions. So, it can also be used to perform Iomega RAID data recovery along with Iomega eGo data recovery.
Reasons behind data loss or deletion from Iomega eGo hard drive
- While transferring data from Iomega eGo hard drive to system, if any sort of interruption takes place then it will result in loss or deletion of data from Iomega eGo hard drive.
- If your Iomega eGo external hard drive is severely infected by some external treats like Trojans or malwares, then there are chances that you may lose your valuable data from it.
- File system carries important information about the drive. So, if the file system of your Iomega eGo hard drive gets corrupted or damaged, then the drive becomes inaccessible. As a result of this, you will lose your entire data stored on Iomega eGo hard drive.
- In order to extend storage capacity of your Iomega eGo hard drive, you may delete unwanted data from it. But, during this deletion process, you may end up with deleting some of your essential files.
In addition to all these scenarios, there are several other reasons that results in loss or deletion of data from your Iomega eGo hard drove such as bad sectors, power surge, improper defragmentation etc. But you don’t have to panic! Because, Iomega Data Recovery Software works efficiently under all these scenarios to let you know how to recover data from Iomega eGo hard drive in short span of time.
Advanced features of Iomega Data Recovery Software
Iomega Data Recovery is a perfect and highly rated tool, which has been suggested by industry professionals to perform data recovery from Iomega eGo hard drive. This advanced utility has power recovery engine that identify and restore 300 file types including video files, images, Word files, Zip files, PPTs, music etc. If your Iomega external drive is failed or corrupted, then this application also helps you in performing Iomega external hard drive failure data recovery. It has strong scanning algorithms to perform Iomega eGo data recovery in an effective and efficient way. It also has simple GUI that guides you how to recover data from Iomega eGo hard drive in few simple steps.
Other than Iomega eGo, it also supports other popular brands of external drives such as WD, Seagate, Toshiba, etc. along with Iomega eGo data recovery. It can also be used to recover data lost or deleted from USB drive, memory cards and iPods. It even supports FAT, NTFS, ExFAT, HFS and HFSX partitions. Its Preview option enables you to view the recovered data prior to restoration. This tool can also use for Iomega StorCenter data recovery from different types of StoreCenter network drives produced by Iomega.
Just like any other Windows systems, data can get lost from Windows 10 drives due to hard drive failure. But, with powerful tools like Iomega Data Recovery, you can restore such data effectively. To know more details on how to get back data from failed Windows 10 drives, visit the following page. https://www.iomega-datarecovery.com/windows-10-hard-drive-failure-recovery.html
Steps for Iomega Ego Data Recovery:
Step 1: Download, and install free version of Iomega Data Recovery Tool on your computer. Connect Iomega hard drive to the system, in which the software has been installed. Launch the tool and select your Iomega external hard drive, and hit Scan button to initiate the scanning process.
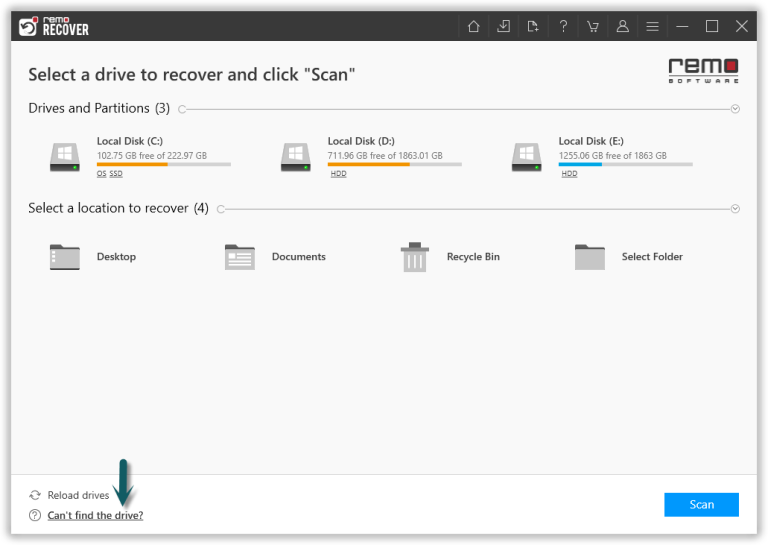
Figure 1: Main Screen
Step 2: The software now scans the Iomega drive, just wait for the tool to complete the scanning process. Upon the completion of quick scan, you can view the recovered files (during which deep scan will be in progress).

Figure 2: Software scanning the drive to find deleted & lost files
Step 3: Before saving the recovered files, just double-click on the file to preview the recovered file to evaluate the recovery results of the software.

Figure 3: Preview Recovered Files
Step 4: Finally, select the files you want to recover, and save them at the desired location of your choice.

Figure 4: Save Recovered Data